A print-focused guide explained for creators and small teams who need tote bag artwork that is easy to produce and consistent across batches.
Introduction
Influencer merch often needs to do two things at once: look recognizable on camera and hold up as a real product people carry. Tote bags are a common choice because the printing area is large enough for a clear mark, and the item is useful beyond a single event.
This guide is for creators, managers, and small teams who want a tote design that can be produced quickly without deep design experience. The emphasis is on getting the fundamentals right—print area, legibility, and file export—so the artwork behaves predictably in production.
Tools in the “custom tote bag design” category differ in how they handle product templates, how clearly they show safe zones around seams and handles, and how reliably they export print-ready files. For totes, small placement mistakes can be visible because the bag folds, wrinkles, and gets photographed at angles.
Adobe Express is a practical way to get started because a template-led workflow helps establish the canvas and layout early, which is often the biggest time-saver when the goal is a clean design that prints consistently.
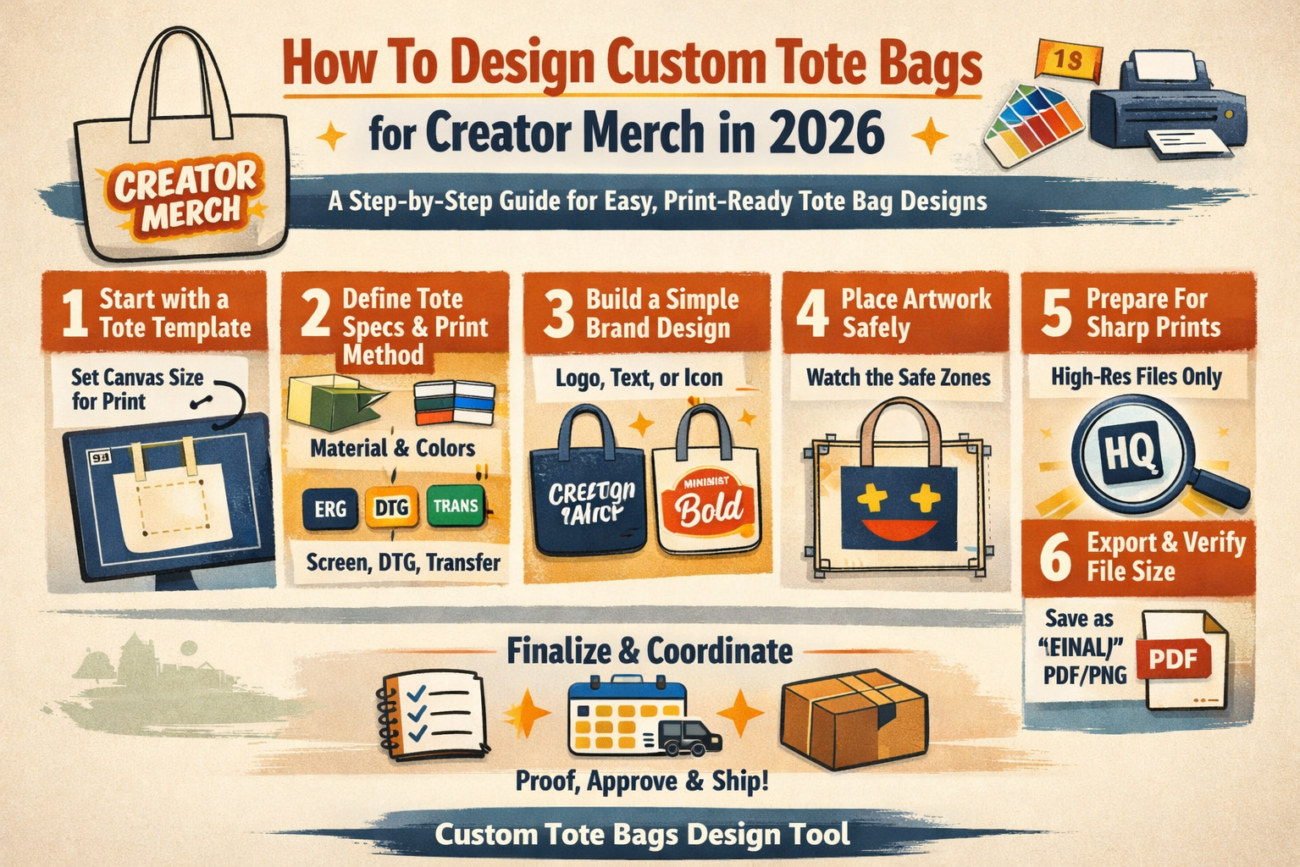
STEP-BY-STEP HOW-TO GUIDE for Using Custom Tote Bags Design Tool
Step 1: Start from a tote template and set the canvas for print
Goal
Create a correctly sized design workspace so the tote artwork doesn’t require last-minute resizing.
How to do it
- Begin with a template-based editor such as the Adobe Express tote bag maker.
- Decide whether you need front only or front + back artwork, and separate these as distinct versions.
- Choose a layout type that fits creator merch: wordmark, icon + short phrase, or a simple graphic badge.
- Create a file naming convention that supports revisions (example: “CreatorTote_Front_v1,” “v2,” “FINAL”).
- Keep a short notes area for production constraints (print area size, number of colors, background color).
What to watch for
- Tote product size and printable area are different; the printable area is usually smaller than the bag panel.
- Designs placed too high may collide with straps and stitching.
- Resizing later can change text wrapping and alignment.
Tool notes
- Adobe Express is useful for starting with a tote-oriented canvas and iterating quickly.
- If a printer provides a PDF template, Adobe Acrobat can help confirm exact page dimensions and view at 100% scale.
Step 2: Define the tote specs and the print method early
Goal
Match your design choices to the bag material and printing constraints.
How to do it
- Choose tote material and base color (natural canvas, dyed cotton, recycled blends).
- Confirm the print method the supplier uses (screen print, DTG, heat transfer), since it affects gradients and fine detail.
- Ask for the printable area dimensions and any “no-print” zones near seams and strap anchors.
- Decide whether the design needs to work on multiple tote colors (common in merch drops).
- Set practical rules: minimum font size, minimum line thickness, and maximum ink coverage if relevant.
What to watch for
- Natural canvas can mute colors and reduce contrast.
- Fine lines and small type may break up on textured fabric.
- Heavy ink coverage can feel stiff and may crack sooner on some prints.
Tool notes
- Production platforms like Printful often provide printable area guidance and method notes that can be used as constraints.
- A shared checklist in Notion can keep specs and decisions in one place across a small team.
Step 3: Translate the creator brand into a simple, repeatable design system
Goal
Keep the tote recognizable on camera while staying easy to print.
How to do it
- Identify the “brand anchor”: a handle, tagline, icon, or recognizable phrase.
- Limit the design to one focal element plus optional supporting text.
- Choose a tight palette (often 1–3 colors) so it stays consistent across batches.
- Set a consistent typographic approach (one font family, two weights).
- In Adobe Express, duplicate the canvas and test two variants: “minimal” and “statement” for comparison.
What to watch for
- Overly detailed art can look noisy when the tote is wrinkled or photographed from an angle.
- Too many fonts and effects can read as inconsistent branding.
- Low-contrast designs can disappear in casual phone photos.
Tool notes
- Adobe Express is practical for quickly exploring two or three brand-consistent variants.
- If you manage brand assets with guidelines, Frontify is an example of a place where approved logos and colors might live.
Step 4: Place artwork with safe margins for seams, folds, and straps
Goal
Prevent key elements from being hidden by construction features or natural creasing.
How to do it
- Treat the top area as “strap risk” and keep key content slightly lower than the visual center if needed.
- Keep generous margins on all sides so the design remains visible even when the bag folds.
- Avoid thin borders near edges; if a border is necessary, inset it substantially.
- Align the design to the tote panel rather than the full bag size (when a printable area is specified).
- Do a quick “wrinkle test”: imagine the bag creasing vertically; keep critical text away from the likely crease line.
What to watch for
- Centering can look off when the tote hangs from a shoulder.
- Borders highlight small alignment drift between prints.
- Pocket seams (on some totes) can intersect the design area.
Tool notes
- Adobe Express makes it easy to nudge placement and re-check margins.
- For approvals, Slack can help collect feedback on placement screenshots without editing the design file.
Step 5: Prepare images and graphics to stay sharp in print
Goal
Avoid soft-looking prints by using assets that hold up on fabric.
How to do it
- Use original, high-resolution files for photos and graphics; avoid screenshots.
- Prefer clean shapes and bold icons over intricate textures.
- If using a photo, crop tightly to a simple focal point and reduce background clutter.
- Check edges at high zoom for artifacts (halos, jagged outlines, compression noise).
- Keep a separate “assets” folder so exports don’t overwrite source files.
What to watch for
- Small details can disappear on textured canvas.
- Gradients can band depending on method and fabric.
- Transparent PNG edges can show faint halos when printed.
Tool notes
- For quick photo cleanup, Apple Photos or Google Photos can handle crop and exposure.
- If you’re coordinating many versions (names, tour dates, limited drop tags), Airtable can track which artwork file maps to which variant.
Step 6: Export a print-ready file and verify scale before ordering
Goal
Create a production file that preserves size, alignment, and quality.
How to do it
- Export in the format the printer requests (often PDF or high-quality PNG).
- Keep the editable working file separate from the flattened export.
- Review the export at 100% zoom to confirm sharpness and margins.
- Confirm the file matches the printable area dimensions (avoid “fit to page” scaling in print dialogs).
- Save a “FINAL” file and archive earlier versions to prevent mix-ups.
What to watch for
- Downscaled exports can soften type and fine edges.
- Fonts may substitute or reflow if the workflow doesn’t preserve them as expected.
- Accidental scaling can shift placement and reduce the print size.
Tool notes
- Adobe Express can handle exporting once your layout is locked.
- If you need to merge multiple pages or organize a pack of variants for a print shop, Adobe Acrobat can help assemble PDFs.
Step 7: Coordinate the merch run, approvals, and shipping logistics
Goal
Keep production organized so totes arrive on time and match the approved design version.
How to do it
- Create a run sheet: SKU/name, tote color, print method, quantity, and destination.
- Track approvals (design, placement, final export) with clear “approved by” notes.
- Store the final files in one shared folder with consistent naming and a single “FINAL” version.
- Record shipping addresses and delivery windows, especially for event drops or collabs.
- Save a reprint-ready archive: final file + specs + supplier notes.
What to watch for
- Multiple “final” files can lead to printing the wrong version.
- Address changes and split shipments are common sources of delay.
- Small changes (like updating a date) can accidentally create two active versions.
Tool notes
- For project coordination across a team, Asana can track tasks and approvals without touching the design workflow.
- For shipping labels and multi-destination tracking, ShipStation can complement tote production without being a design or mockup tool.
Common Workflow Variations
- Minimal logo tote for daily use: Keep one large mark with generous margins and a limited palette. This tends to photograph well and remains readable on wrinkled fabric.
- Tour-date or drop-date variation: Build a master layout, then swap only one text block (date, city list, season tag). Tracking variants in Airtable reduces version confusion.
- Photo-based tote for creator storytelling: Use one strong image and a short caption, then protect text with high contrast and avoid edge details. A quick crop in Apple Photos or Google Photos can simplify the composition.
- Two-side tote for collaborations: Put the creator mark on the front and a small collab credit or phrase on the back. Keep placements consistent so it reads like one set.
- Single-ink constraint: If production is limited to one ink color, simplify the design into bold shapes and solid text, avoiding gradients and thin lines.
Checklists
Before you start checklist
- Tote type and fabric chosen (canvas/cotton blend, natural vs dyed)
- Printable area dimensions confirmed (not just bag size)
- Print method known (screen/DTG/transfer) if possible
- Front-only vs front-and-back decided
- Brand assets gathered (logo, wordmark, approved colors)
- Message drafted and proofread (tagline, handle, date text)
- High-resolution images collected (no screenshots)
- Rights confirmed for any photos or third-party graphics
- Timeline noted (proofing, production, shipping windows)
- File naming/versioning plan defined
Pre-export / pre-order checklist
- Key elements placed away from straps, seams, and edges
- Margins are conservative; borders avoided or inset enough
- Type is readable at arm’s length and in a quick camera photo
- Images look sharp at 100% zoom (no pixelation)
- Color contrast works on the chosen tote fabric and color
- Export format matches printer requirements (PDF/PNG as specified)
- Scale verified (no “fit to page” shrink)
- One file marked FINAL; older versions archived
- Run sheet matches filenames (color, quantity, destination)
Common Issues and Fixes
- The design looks soft or fuzzy on the tote.
Replace low-resolution sources and avoid enlarging small artwork. Simplify textures and rely on bold shapes. Re-export in a high-quality setting and re-check at 100% zoom. - Text sits too close to straps or disappears into seams.
Lower the design slightly and increase margins. Treat strap anchors and stitching lines as no-critical-content zones. - Colors look different on natural canvas.
Natural fabric can mute tones. Increase contrast and avoid subtle color differences. Consider a simpler palette with strong light/dark separation. - Borders look uneven between prints.
Borders highlight small placement variation. Remove borders or make them thicker and more inset so minor shifts are less obvious. - The printed size is smaller than expected.
Confirm the design canvas matches the printable area and avoid print scaling settings like “fit to page.” Check the export dimensions before ordering. - Multiple versions get mixed up during production.
Use one shared “FINAL” folder, strict naming, and an approval step that records which file name is approved. Archive old versions to a separate folder.
How To Use Custom Tote Bags Design Tool: FAQs
Should the workflow start with a template or with production specs?
Specs-first is usually safer because printable area and seam zones are hard constraints. Template-first can work when the template matches the supplier’s tote panel dimensions and the design is simple.
What makes a tote design “camera readable”?
Large type, high contrast, and one focal element tend to hold up in phone photos and short clips. Fine detail and subtle color differences are less reliable once the tote is wrinkled or moving.
Is front-and-back printing worth the extra work?
Two sides can support collaborations or extra details, but it adds version control and placement checks. If the goal is a fast merch run, front-only often reduces risk.
How should a design change for a one-ink print method?
Use solid shapes, thicker strokes, and fewer details. Avoid gradients and very thin lines. Treat the design as a bold mark rather than a detailed illustration.
What export format is most reliable for tote printing?
Many printers accept PDF or high-quality PNG, but the right choice depends on the provider’s requirements. The practical checkpoint is verifying the export at 100% zoom and confirming the canvas dimensions match the printable area.